What is koji fermentation?
Fermentation is a hot topic in hospitality. These techniques — some of which, like koji-making, date back over a thousand years or more — are finding use in the world’s best bars and restaurants. They’re creating flavours and experiences you can only get from the hands of some rather innovative bartenders and chefs.
And it was koji fermentation which formed the basis of an in-depth workshop co-hosted by Saeko Iieda and Luke Whearty for scholars from The Scholarship by The Blend a couple months back.
Here’s what we learned.
Saeko Iida was born in Japan and grew up there, before moving to Melbourne in 2011. She began making koji seven years ago and opened Koji & Co {LINK} in 2019. Luke Whearty is the bartender-owner behind Melbourne cocktail bar BYRDI, who you may know as the award-winning bartender from previous series such as BYRDI At Home.

What is exactly is koji?
Summarised… it’s a fermentation culture which is added to grains and beans and used to make a number of Japanese products, like Kirin, shoe, sake, shochu and many more.
Koji-making involves the use of koji spores, which are living microbes, and no one batch of koji is ever the same, says Saeko.
“Koji-making is often compared to raising children,” she says. “Each child is unique and different.” So too is each batch of koji.
These koji spores are a type of mould or fungi that will convert starches — from things like rice, say — into fermentable sugars.
“Your koji-making journey is going to be a long journey of trial and error,” Saeko says.
A word of warning though!
Koji-making is a form of fermentation, and like all types of fermentation, care must be taken. If not made properly, these fermentation processes can poison people, and they certainly won’t taste good.

How to make koji
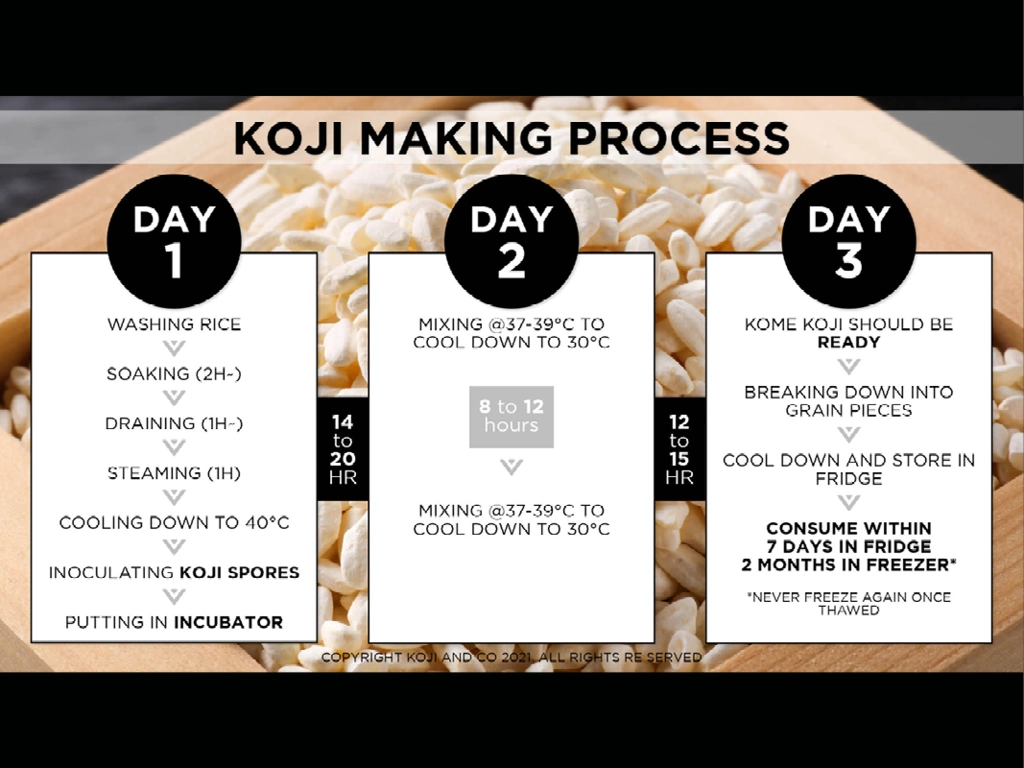
Koji-making is a two to three day process, says Saeko, and it may not be as simple as you think — koji-making is not a set and forget operation.
“Day one is the ‘business day’ of the process,” she says.
Working with a ratio of 1g of koji spores making 1kg of rice, the first step is to wash the rice. You then want the rice to soak in water from the tap (not hot; from the cold tap is fine) for around two hours.
Drain the water from the rice for around one hour. Note that this draining of the rice is essential, and the koji won’t grow well if the draining is not complete.
The next step is to steam the rice for one hour.
Once the rice is steamed, cool the rice down to just below 40 degrees Celsius. To do this, break the steamed rice into pieces on a tray. The temperature here is crucial; above 40 degrees Celsius and the koji spores will be killed. Remember, these are living microbes.
“Temperature is key,” says Whearty. “Take the time. As soon as you try to rush things, that’s when things go wrong.”
Once the rice is down to temperature you can begin to inoculate the rice with the koji spores. There are different types of koji spores; the type which Saeko used in the workshop are Aspergillus oryzae, a mainstream type of koji spores used for fermenting rice and barley.
Add the spores over the rice, and then mix the rice quite vigorously to disperse the spores throughout the rice evenly. Doing this will break the rice down a little and increase the surface area that comes into contact with the spores, helloing to create an even covering.
The next step is to place the tray with the inoculated rice into an incubator. You can pick up the trays for the storing of koji from Koji & Co. These go inside the incubator.
Put the inoculated rice into the incubator, put the lid on, and leave it at 30 degrees Celsius for a day and bit. Inside the incubator, Saeko suggests using a small heater designed for reptiles.
The Koji should start to grow after a few hours. When the temperature of the koji reaches just below 40 degrees Celsius you need to mix it again and break it down into small pieces again, so the koji is cooled down and so that oxygen is introduced for the koji. This happens around 10 hours after it’s in the incubator.
Moving the rice around allows oxygen to be introduced to help keep the koji growing. It’s not a set and forget process. “You have to be tending to it quite a bit,” says Whearty.
This will need to be repeated again until the fermentation is complete.

KOJI MAKING PROCESS
Download the PDF by clicking below.
POINT TO NOTE:
Once the fermentation is complete, the koji needs to be broken down again, cooled down and stored safely. It needs to be used within seven days. You can freeze it for up to two months, but once thawed do not freeze it again.
The incubator they use at BYRDI is a black Styrofoam box — any sealable Styrofoam box will do.
It’s important to note that unlike kombucha fermentation or other types of fermentation, you must not use one batch of koji to create a new batch. It can be dangerous and it will also taste bad.
“Koji fermentation is very different to other fermentations like kombucha making,” says Saeko.
When you keep it for too long, the enzymes become weaker and it won’t ferment well; this can also allow other more dangerous bacteria the opportunity to grow.
